And the winner is…

Well done to Mara Kockaerts! How fitting to have a Mara win the Mara blouse pattern!

Send in some pics when you’ve made the blouse!

To those who didn’t win don’t forget, if you entered, you can get 10% off when the pattern is launched next week! There’s also a whole host of other blogs on the launch tour, if you’re quick you may be able to enter another giveaway.

Mara Blouse Pattern Giveaway

I’m really excited to announce that our blog is doing its first ever giveaway!

A few blog posts ago I reviewed a pattern from Compagnie M called the Mara Blouse – a cute, vintage-inspired little girl’s blouse – remember?

hanging cu

Well after toiling for weeks over final tweaks and exciting additions to the pattern Marte from Compagnie M is now ready to launch her first ever commercially available pattern! To celebrate the momentous occasion we are taking part in the ‘launch tour’ and giving readers a chance to win a free copy of the digital pattern. On top of this all entrants will also be eligible for 10% off the 7 euro purchase price  – after the pattern is launched on 1st October (assuming you are not the lucky winner).

I loved making the blouse and a thinking of whipping up a long-sleeved dress version for S to wear to an upcoming wedding.

The prize up for grabs is the full Mara Blouse download which includes…

  • The pattern includes:
  •  Sizes: 1y, 18 months, 2y, 3y, 4y, 5y, 6y, 7y, 8y, 9y, 10y.
  • Three sleeve patterns are included: butterfly, flutter or long sleeves. The flutter sleeve & long sleeve can also be combined. Sleeveless is of course also an option.
  • Two tutorials to easily adjust the blouse to a basic A-line dress or a gathered skirt dress. Detailed drawings will guide you through this process.
  • The 46 page PDF file includes:
  • Instructions (22 pages).
  • A pattern WITH seam allowance included (12 pages)
  • A pattern WITHOUT seam allowance included (12 pages) (This way you can choose the version you prefer to work with).

Click the link below to enter the comp!

a Rafflecopter giveaway

Competition closes 11pm 27th September 2013

There are a host of other blogs on the ‘Giveaway Tour’…So why not check them out too…

Good Luck!

Mara blouse give away tour

National Needlework Archive

It turns out the British National Needlework Archive is 10 minutes from my house.  It turns out I drive past it every day amongst the run down building of the converted Greenham Common Airbase – now an industrial park on the outskirts of my home town Newbury. Turns out someone my mum knows arranged for a Quaker Tapestry to come down from its permanent base in Kendal to have a special exhibition at the archive. With all those coincidences, even though tapestry hasn’t ever really been a particular interest of mine – overwhelming curiosity took me and my mum on a visit to the archive this weekend.

I am so glad I did – This place is awesome! The building is a little odd, it’s a converted chapel and I’m pretty sure I did kung fu there when I was a teenager for a few weeks…but inside now it is a real Aladdin’s cave with amazing works of textile art. There’s a library with knitting and sewing magazines archived back to 1900…there’s a small haberdashers with a stock of quilting cotton and there’s a room for workshops and two exhibition spaces, as well as a little tea room. It’s all run by volunteers.

Image

They also run textile art competitions which I find really exciting – I have made quite a few fabric pictures and love doing stuff like that but finding sufficient inspiration to make me realise I do have the time and it is worth doing is difficult. Having a competition to work on would be fantastic. Watch this space! The next one is the ‘Poetry in stitches’ competition so I’m going to investigate that when the details are realeased.
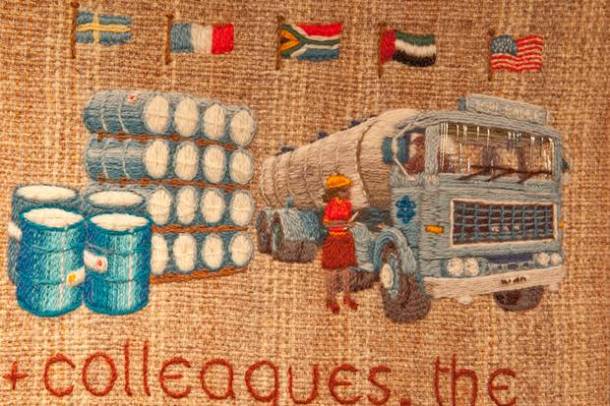
The Quaker Tapestry

I found the Quaker tapestry a little confusing at first, it’s in a very traditional style (I mean 17th century traditional) but it was only made from 1981 – 1996. I couldn’t help thinking it if I had done it I would have gone for something a bit more modern. It charts the story of Quakers up to modern times. It’s interesting and some of the needle work was wonderful, I found the depictions of modern life (peace protests etc) the most interesting, because it contrasted with the overall style.

Image

The Country wife by Constance Howard

Image

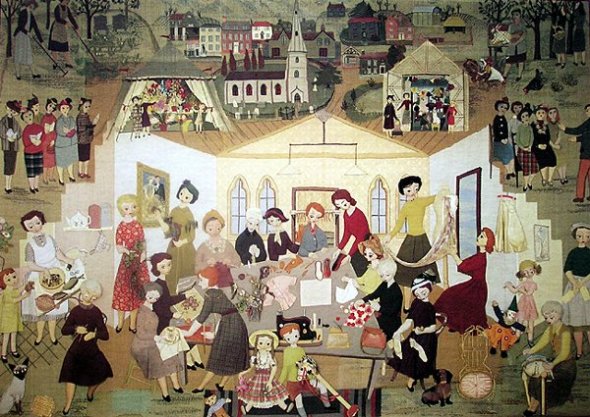
This totally blew me away – I am besotted with it, I can’t believe it has been just down the road for so long and I never knew! Made for the 1951 festival of Britain this wall hanging depicts the life of a countrywife in the 1950’s, it’s like a Stanley Spencer painting, only made almost entirely from fabric, embroidery and raw edge appliqué. Mary Quant worked on this when she was a student of Constance Howard’s. What you can’t see from the picture is that this wall hanging is huge – maybe 4 meters by 3 meters, and a lot of the figures are 3D, partially stuffed with 3D props in their beautifully crafted hands. The faces were all done by Constance herself and the style of the faces is strikingly 1950’s (not to mention the clothing – those hats!).

 Image

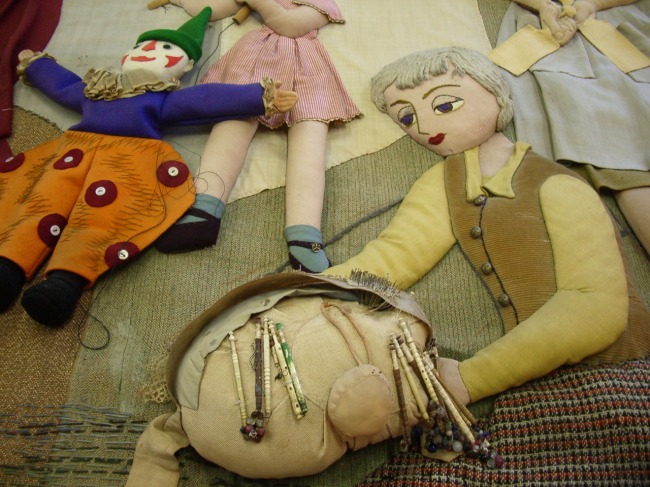
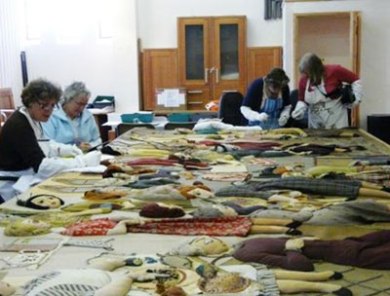
The hanging is being painstakingly cleaned and conserved by local volunteers, I was so captivated that I put my name down. They are trained by a textile conservationist and have been slowly cleaning the fabric and documenting its condition for the last 3 years.

Image

All in all it’s a funny little place but charming and I will definitely go there again, hopefully to do a bit of conservation myself.

Mara Blouse Pattern Test for Compagnie M

A few weeks ago I was really excited to find out that I had been selected by Marte at Compagnie M to carry out a pattern test for her new Mara Blouse, a soon to be released pattern which will be available for download on her website.

Marte is a sewer, blogger and pattern drafter based in Belgium who has been releasing free patterns for funky children’s clothes for a while now. Recently she’s decided to branch out and plans to offer some for paid download too. One of the first of these to be available will be the charming Mara Blouse.

I was excited to be a pattern tester, but nervous too – what if it all went wrong? What if the pattern was too advanced for me? Could I get it all done in the time? But I desperately wanted to do it so as soon as the link to the downloadable pdf was sent over I printed out the pattern and stuck it all together.

The cutting lines are well spaced and colour coded which makes it really simple to cut out.

One thing I love about kids clothes is that you can often use up remnants in your fabric stash. I used some linen left over from my Mathilde blouse and some Amy Butler scraps left over from some placemats I made my mum about 5 years ago. I love the look of using the fabric for the yoke as the back bodice fabric too.

3 fabrics turnaround

I wasn’t sure about using the three different fabrics at first but I think it looks really fun and bright.

full hanging with raspberry

We did our little photoshoot at a local pick-your-own farm.

This is the first time I’ve used piping on a garment and it was a little fiddly – but I was in at the deep end trying to put it around a curved yoke. It was worth the effort though, it really sets off the contrasting fabrics well.

hanging cu

I found the yoke tricky to fit (because I followed the instruction wrongly!) but got there in the end.

I didn’t have enough fabric to match the pattern on the little butterfly sleeves but they still look cute! I also realised I had sewn the pink linen wrong side up so my pintucks turned out like pleats, but I think it looks nice like this anyway and after the struggle to fit the yoke I was NOT unpicking it!

smiley

Smiley shot – complete with strawberry juice on shorts!

It’s a great fit and I made no adjustments, S is small for her age and I used age 3 size.

Pattern drafting – girl’s apron dress!

I did it! I made my own pattern – okay so it’s very simple and there’s plenty of room for improvement but I’m really pleased with it.

I started off by taking my daughter’s measurements and also measuring some of the clothes she is wearing at the moment. Then I made some sketches and started drafting the pattern pieces. I thought it best to keep things simple to start off with.pattern

draftingcutting

I wanted to make a pinafore with a cross over back like one of her dollies has. I thought it would be great to have big deep pockets to put all her bits and bobs in.

sewing

In the first draft I made I used her exact measurements…I quartered her chest measurement, added seam allowance and used it to draft a front and back piece to be cut on the fold. I forgot to add ‘wiggle room’ and the thing fitted like a sausage skin and she couldn’t sit down!! So I had to let the seams out a lot which has made the inside a bit dodgy in places.

I love the toadstool button on the front pocket and the vintage buttons I used on the straps.

split pic of serensplit pic 2

I should have stay stitched the shaping on the back yoke and skirt because the fabric on the back skirt piece stretched when I was putting it together – I ended up putting in a little pleat  in the back – I actually really like this feature and will put a proper pleat in if I do it again. I also think I could have gone with more of an a-line on the skirt, it looks a little boxy in the pictures and a little too long.

It was really satisfying to design and make something from scratch…the downside is Seren really doesn’t want to wear it and much bribery was involved in the taking of these pictures! Maybe next time I’ll try and draft something for myself – if anyone has recommendations for some pattern drafting books, let me know…


Denim Ginger Skirt

I was looking for a smartish denim skirt that I could wear to work, but also dress down at the weekends and decided to go for the Colette Ginger skirt. It is SOOO simple to make and has three different waistbands to choose from  and the shaped ones add a nice bit of detail to an otherwise plain skirt.

full length no head

(I even got my legs out…apologies!)

I chose the curved waistband for my denim version. I’m trying to choose patterns that I can learn some new techniques in at the moment and this was my first invisible zip! Well, actually it was my second because I had to rip the first attempt out and start all over again as I had ended up a blatantly obvious zip rather than an invisible one (didn’t take a photo of that – I should have done)!

zip

(a bit creased from the car journey but pretty near invisible)

To install the zip I followed the tutorial on the Colette website which were really clear. The issue the first time around for me was that I hadn’t pressed it down enough with the iron before I started, so I couldn’t get as close to the zip as I needed to when I was sewing. The other problem was that I didn’t have an invisible zip foot for my machine – I just used the normal zip foot, which was tricky but worked okay in the end. It’s not completely invisible but I think it looks pretty good for a first/second attempt.

I did the facing with some ticking I had spare and edged the seams with homemade bias binding in the same fabric. In some parts I managed to make a complete bodge of this very simple task, I think I got a bit over excited and rushed at the end so had to redo some bits there too.

lining shot

I had some help from a friend to do the hem who had an amazing free-standing hem measuring device with little fold out legs – it worked a treat, this is the best hem I’ve ever done. I can only seem to find them on ebay. I decided to hand stitch an invisible hem as although it’s denim I didn’t use top stitching anywhere else so I thought it might look a bit odd.

hem measurer

(hem gadget! – I want one – have ever used one?)

I’m really pleased with this skirt, I’ve already worn it loads – one weird thing is that subconsciously my brain wants it to have pockets and I keep going to put things in them then finding they’re not there. Maybe it’s just the denim tricking me into thinking I’m wearing jeans. It’s a bit creepy – have you ever had phantom pocket problems?

silly pose

Cheesy pose alert!

Summer’s finally arrived so took some picks at a flower meadow near our house. Lovely.

A little bit of imagination – creating a pattern hack!

Nowadays with indie pattern companies like Colette, Megan Nielsen and Doe and Deer creating their own designs there are some really modern patterns just waiting to be printed out and made up. It is a modern dressmaking revolution but the more traditional companies making patterns like, Simplicity, Vogue or Butterick still have a lot to offer, sometimes you just need a bit of imagination.

Often at first glance the pictures on the front of the pattern pack can seem out dated, the fabric choice hideous and the models are, well, difficult to identify with! This is where the imagination comes in – in a recent project I made for my little girl I decided to dip my toe into the art of pattern hacking with Simplicity pattern 1673!

Pattern hacking – changing a pattern to create a unique item of clothing based on, but deviating from an original ‘base’ pattern.

packet small

Initial impressions

I am not a frilly person and this just has way too much going on. Whilst on their own they might be okay when put altogether the yellow broderie anglais, the flower shaped buttons and the frill are too much for my taste. But looking behind all that what you actually have is an interesting structure for a child’s dress; the loop button closure at the back, the circular yoke and the tucks at the top (hidden by the frill) are all nice features which I think deserve to take the limelight.

_MG_5868

My hack…

First, although the pattern recommends using light weight fabrics I decided to make the dress in a light denim which would show more of the structure of the dress off. The frills in the pattern were added on top of the yoke so I did away with them and added a patch pocket in deck chair striped fabric to the front with a contrasting pocket band and a small gather. I used pink, homemade bias binding on the arm holes with contrasting red stitching to tie in with the pocket, and matched that in with the closure on the back. I decided to make the dress more of a tunic length to be worn with little leggings and did two rows of top stitching around the hem in red thread which took the place of more frills on the base pattern.

_MG_5869

Overall I’m really pleased with the look of the dress and it’s definitely a million miles away from the picture on the pack and I’ve made a bespoke item of clothing. It’s boosted my confidence – I might try and draft my own dress pattern next time!

Project summary

What went well.

  • The overall look of the dress is great, I love the way the tucks at the front look in the heavier fabric
  • I’ve done a bit of pattern drafting from scratch in the past but using a pattern to start of with is a great way to get back into it without all the head scratching and frustration that can come with creating your own pattern
  • I couldn’t use French seams with the denim because it would be too bulky so I used bright red seam tape to finish the insides

Room for improvement?

  • In the end it worked out fine but choosing to use a heavier fabric did cause a few problems. The method of construction for the yoke on this dress was really designed for cotton and getting the circular shape out of denim was a bit tricky…there’s still one or two dodgy bits which I would liked to have done better!
  • I just wahse dit and the band a the top of the pocket ran a little…doh!

Top tip – 

Rather than looking at the photo on the front take a look at the pattern diagram on the back of the pack. From that you will get a better idea of how the pattern is constructed and it will give you more of a ‘blank canvas’ to build up your own design from.